为网站添加 Certificate Transparency
什么是 Certificate Transparency? 附上 官网 上的介绍:
Google's Certificate Transparency project fixes several structural flaws in the SSL certificate system, which is the main cryptographic system that underlies all HTTPS connections. These flaws weaken the reliability and effectiveness of encrypted Internet connections and can compromise critical TLS/SSL mechanisms, including domain validation, end-to-end encryption, and the chains of trust set up by certificate authorities. If left unchecked, these flaws can facilitate a wide range of security attacks, such as website spoofing, server impersonation, and man-in-the-middle attacks.
大意就是说,Certificate Transparency 作为 TLS/SSL 协议的补充,可以帮助解决很多问题,提升安全性。个人理解,这玩意主要还是用了防止 CA 误签发证书,验证证书的有效性,防止各种误操作。
因为 Let's Encrypt 的 OCSP Stapling 还没改造完,所以我们还得通过 TLS Extension 附带 Certificate Transparency 信息。那么问题来了,Nginx 的动态模块没有 API 级别的兼容(真是鸡肋……),这意味着什么?
我们又得编译 Nginx 了![1]
首先停止正在运行的 Nginx 服务:
sudo service nginx stop
下载源码:
wget http://nginx.org/download/nginx-1.9.12.tar.gz
tar xvf nginx-1.9.12.tar.gz
或者如果你有添加 Nginx 官方 mainline 的软件源,则可以:
apt-get source nginx
下载 nginx-ct 模块:
git clone https://github.com/grahamedgecombe/nginx-ct
进入 nginx-1.9.12 目录:
cd nginx-1.9.12
看看现有 Nginx 的编译参数,记下:
nginx -V
使用这些参数执行 configure,记得加上 --add-dynamic-module=../nginx-ct。比如说我的~~(真是又臭又长)~~:
./configure --prefix=/etc/nginx --sbin-path=/usr/sbin/nginx --modules-path=/etc/nginx/modules --conf-path=/etc/nginx/nginx.conf --error-log-path=/var/log/nginx/error.log --http-log-path=/var/log/nginx/access.log --pid-path=/var/run/nginx.pid --lock-path=/var/run/nginx.lock --http-client-body-temp-path=/var/cache/nginx/client_temp --http-proxy-temp-path=/var/cache/nginx/proxy_temp --http-fastcgi-temp-path=/var/cache/nginx/fastcgi_temp --http-uwsgi-temp-path=/var/cache/nginx/uwsgi_temp --http-scgi-temp-path=/var/cache/nginx/scgi_temp --user=nginx --group=nginx --with-http_ssl_module --with-http_realip_module --with-http_addition_module --with-http_sub_module --with-http_dav_module --with-http_flv_module --with-http_mp4_module --with-http_gunzip_module --with-http_gzip_static_module --with-http_random_index_module --with-http_secure_link_module --with-http_stub_status_module --with-http_auth_request_module --with-http_xslt_module=dynamic --with-http_image_filter_module=dynamic --with-http_geoip_module=dynamic --with-threads --with-stream --with-stream_ssl_module --with-http_slice_module --with-mail --with-mail_ssl_module --with-file-aio --with-http_v2_module --with-cc-opt='-g -O2 -fstack-protector --param=ssp-buffer-size=4 -Wformat -Werror=format-security -Wp,-D_FORTIFY_SOURCE=2' --with-ld-opt='-Wl,-Bsymbolic-functions -Wl,-z,relro -Wl,--as-needed' --with-ipv6 --add-dynamic-module=../nginx-ct
没报错就好,老规矩缺啥装啥。接下来编译它:
make
sudo checkinstall
等着吧。喝茶去。搞完后打出的包在同目录下,安装好的 Nginx 可以通过 dpkg 管理。
如果你不喜欢喝茶,也可以在这段时间里新建一个 ssh 连接,提交证书并且获取 sct信息。
首先下载 ct-submit:
git clone https://github.com/grahamedgecombe/ct-submit.git
安装 golang 并且编译:
sudo apt-get install golang
go build
同目录下应该会出现 ct-submit 二进制文件。接下来提交证书并且获取 sct 信息:
./ct-submit ct.googleapis.com/aviator < /path/to/your/fullchain.pem > aviator.sct
记得替换为你自己证书的路径,必须要包含了全部依赖的 fullchain。同目录下的 aviator.sct 就是获取的 sct 文件了。将其放到一个独立的文件夹里,这里以 /var/www/scts/ 为例。
编辑 Nginx 配置文件,加载动态模块:
sudo vim /etc/nginx/nginx.conf
在最上头加上:
load_module modules/ngx_ssl_ct_module.so;
load_module modules/ngx_http_ssl_ct_module.so;
编辑站点配置文档,比如说我的:
sudo vim /etc/nginx/sites-enabled/ghost
在 server 段加入以下内容:
ssl_ct on;
ssl_ct_static_scts /var/www/scts;
别忘了把目录换成你自己存放 sct 文件的地方。重启 Nginx:
sudo service nginx restart
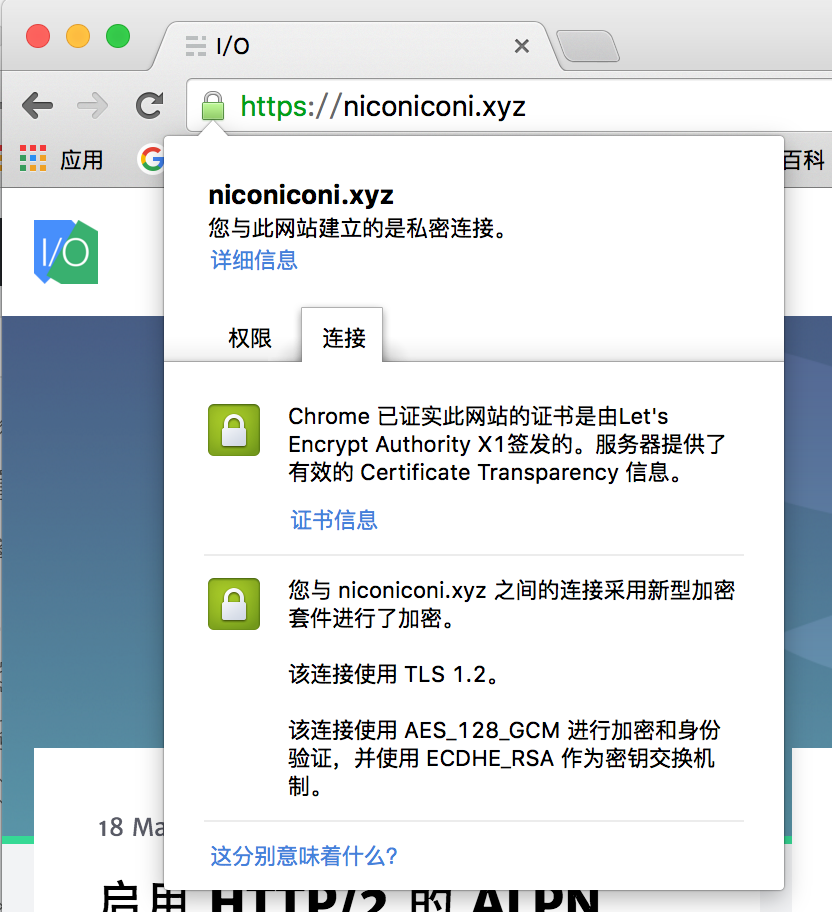
如果一切正常,那么 Chrome 应该可以正常显示 Certificate Transparency 了。

问:说了这么多,Certificate Transparency 对于普通博主、站长到底有什么用?
答:装逼。
Excited.
- nginx-ct 只支持 OpenSSL 1.0.2 以上的版本。如果你的系统自带的 OpenSSL 版本过低,可以参考这篇博文 在 Ubuntu 上打包安装新版 OpenSSL。 ↩︎